Hello friends, Recently for some reason I have to delete my old react native project and create new one. So I simply use NPM command to create new RN project. But when I run the project using NPX command to my android device then I saw a Large Error message regarding to JAVA version. I was so worried because few minutes back my old project is working fine and there is no error but when I created new project there is a large error message. So after reading the message I understand that my Java version is older then I expected. So I have to update it. Now the main thing is that when I was Google the error then I saw there are a lot of people who are facing the same problem. So I thought let’s make a tutorial on it so it will help the others. So in this tutorial we would learn about React Native Solve Android Gradle Plugin Requires Java 11 to Run Error.
Screenshot of Error Message :-
Contents in this project React Native Solve Android Gradle Plugin Requires Java 11 to Run Error :-
1. First of all we have to know which JAVA version we are using currently in our computer. It is very easy to find out. All we have to do is open the Command Prompt in your machine and execute below command.
Screenshot of My Java Version :-

As you all can see in above screenshot I’m using way to old Java in my computer. My Java version is 1.8.0 . So I have to update it to latest version.
2. Now before getting update first we have to uninstall the previously installed version of JAVA from our computer. To do that all you have to do is Go inside you Control Panel -> Programs & Features -> Uninstall JAVA from there.

3. Next thing you have to do is Restart Your Computer.
4. After successfully done restart, Now go to Java Downloads. Download the latest version of Java from there.
5. After done downloading Java Setup file, Install it. Now again Restart Your Computer.
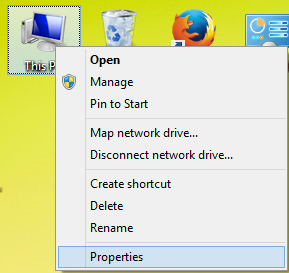
6. Now the main thing we have to do is Setup JAVA_HOME variable PATH again in our computer. So Right Click on your My Computer and Go To Properties.

7. Go To Advanced System Settings.
8. Click on Advanced -> Environment Variables.

1. First of all we have to know which JAVA version we are using currently in our computer. It is very easy to find out. All we have to do is open the Command Prompt in your machine and execute below command.
Screenshot of My Java Version :-
As you all can see in above screenshot I’m using way to old Java in my computer. My Java version is 1.8.0 . So I have to update it to latest version.
2. Now before getting update first we have to uninstall the previously installed version of JAVA from our computer. To do that all you have to do is Go inside you Control Panel -> Programs & Features -> Uninstall JAVA from there.
3. Next thing you have to do is Restart Your Computer.
4. After successfully done restart, Now go to Java Downloads. Download the latest version of Java from there.
5. After done downloading Java Setup file, Install it. Now again Restart Your Computer.
6. Now the main thing we have to do is Setup JAVA_HOME variable PATH again in our computer. So Right Click on your My Computer and Go To Properties.
7. Go To Advanced System Settings.
8. Click on Advanced -> Environment Variables.
React Native Solve Android Gradle Plugin Requires Java 11 to Run Error in Windows
Hello friends, Recently for some reason I have to delete my old react native project and create new one. So I simply use NPM command to create new RN project. But when I run the project using NPX command to my android device then I saw a Large Error message regarding to JAVA version. I was so worried because few minutes back my old project is working fine and there is no error but when I created new project there is a large error message. So after reading the message I understand that my Java version is older then I expected. So I have to update it. Now the main thing is that when I was Google the error then I saw there are a lot of people who are facing the same problem. So I thought let’s make a tutorial on it so it will help the others. So in this tutorial we would learn about React Native Solve Android Gradle Plugin Requires Java 11 to Run Error.
Hello friends, Recently for some reason I have to delete my old react native project and create new one. So I simply use NPM command to create new RN project. But when I run the project using NPX command to my android device then I saw a Large Error message regarding to JAVA version. I was so worried because few minutes back my old project is working fine and there is no error but when I created new project there is a large error message. So after reading the message I understand that my Java version is older then I expected. So I have to update it. Now the main thing is that when I was Google the error then I saw there are a lot of people who are facing the same problem. So I thought let’s make a tutorial on it so it will help the others. So in this tutorial we would learn about React Native Solve Android Gradle Plugin Requires Java 11 to Run Error.
Screenshot of Error Message :-
 Contents in this project React Native Solve Android Gradle Plugin Requires Java 11 to Run Error :-
1. First of all we have to know which JAVA version we are using currently in our computer. It is very easy to find out. All we have to do is open the Command Prompt in your machine and execute below command.
Screenshot of My Java Version :-
 As you all can see in above screenshot I’m using way to old Java in my computer. My Java version is 1.8.0 . So I have to update it to latest version.
2. Now before getting update first we have to uninstall the previously installed version of JAVA from our computer. To do that all you have to do is Go inside you Control Panel -> Programs & Features -> Uninstall JAVA from there.
 3. Next thing you have to do is Restart Your Computer.
4. After successfully done restart, Now go to Java Downloads. Download the latest version of Java from there.
5. After done downloading Java Setup file, Install it. Now again Restart Your Computer.
6. Now the main thing we have to do is Setup JAVA_HOME variable PATH again in our computer. So Right Click on your My Computer and Go To Properties.
 7. Go To Advanced System Settings.
 8. Click on Advanced -> Environment Variables.
 9. Now under System Variables -> Select your JAVA_HOME variable and click on Edit button. To reset the Path again with new JAVA Installation directory.

10. Now Go Inside your C Drive -> Program Files -> JAVA installation directory and simply Paste the JAVA directly Path here like I did in below screenshot.
11. Click on the OK button and Restart Your Computer to make it work. Now you’re good to go. Your Android Gradle Plugin Requires Java 11 to Run error will now be solved. Hope you have liked our tutorial.
Screenshot of My App after solving the Problem :-

1. First of all we have to know which JAVA version we are using currently in our computer. It is very easy to find out. All we have to do is open the Command Prompt in your machine and execute below command.
Screenshot of My Java Version :-
As you all can see in above screenshot I’m using way to old Java in my computer. My Java version is 1.8.0 . So I have to update it to latest version.
2. Now before getting update first we have to uninstall the previously installed version of JAVA from our computer. To do that all you have to do is Go inside you Control Panel -> Programs & Features -> Uninstall JAVA from there.
3. Next thing you have to do is Restart Your Computer.
4. After successfully done restart, Now go to Java Downloads. Download the latest version of Java from there.
5. After done downloading Java Setup file, Install it. Now again Restart Your Computer.
6. Now the main thing we have to do is Setup JAVA_HOME variable PATH again in our computer. So Right Click on your My Computer and Go To Properties.
7. Go To Advanced System Settings.
8. Click on Advanced -> Environment Variables.
9. Now under System Variables -> Select your JAVA_HOME variable and click on Edit button. To reset the Path again with new JAVA Installation directory.
10. Now Go Inside your C Drive -> Program Files -> JAVA installation directory and simply Paste the JAVA directly Path here like I did in below screenshot.
11. Click on the OK button and Restart Your Computer to make it work. Now you’re good to go. Your Android Gradle Plugin Requires Java 11 to Run error will now be solved. Hope you have liked our tutorial.
Screenshot of My App after solving the Problem :-


No comments:
Post a Comment